Beverage On Ground!
No, I would never pour my Fresca on the ground! This isn’t that kind of beverage! This is the receive-only antenna originally designed by Harold H. Beverage in 1921 however over the last 100 years people have developed new designs like the BOG (Beverage On Ground). I used the highly advanced kit BevFlex-4X/Q from Unified Microsystems to build a four direction, switchable, low noise HF receive antenna that runs along (adjacent to) the ground attached to the wood privacy fence in the back yard. One very good YouTube on this is available here: https://www.youtube.com/watch?v=HZiQXihUvIo&t=73s
I also posted a YouTube video here: https://youtu.be/88dLqhdNRg0
A Beverage on Ground (BOG) antenna is an excellent complement to the 43 ft vertical ground-mounted antenna and the BOG is a compact alternative to the full size Beverage. This means it actually fits in my property! By adding a BOG to my existing setup I significantly enhanced my ability to hear weak signals on lower bands and without any visual changes to the property!
Like many other amateur radio enthusiasts I live in an HOA. I love HF but I cannot install a 40 ft tower and high gain directional antenna. I have to be stealthy and I have to be neighborly. Likewise I do not have an amplifier because if I can’t hear them, more power isn’t helpful (it drives me crazy when I receive a signal at -5 dB but they cannot hear me). I find the improper use of amplifiers to be a real annoyance.
Fortunately my yard is larger than most HOA properties (I have almost 1/2 acre total). So I have that in my favor. Also, I enjoy a engineering and fabrication challenge because it gives me a drive to attempt new things, new puzzles to solve and great opportunities to learn hands-on.
A few brief points about my vertical antenna
- I worked with my adjacent neighbors and the HOA to seek approval of a 43-ft vertical antenna on a tilt-over base (DX Engineering MBVE-5AE Series SAF-T-TILT) – promising that I would only have it upright when I’m actively using it.
- Also it’s not observable from the street and front yard and from other angles it’s difficult to see as it tapers in size every 4 feet. The top section is the width of a pencil.
- I coated the brilliantly shiny aluminum with a gray spray paint. Each year or two I re-apply the paint.
- To use it effectively I implemented a remote tuner. Initially I used a 200 watt LDG remote tuner which worked great until I tried operating on 80 and 160 meters. With some effort 80m would tune but 160m was impossible. The LDG tuner didn’t have the inductance and capacitance necessary for the impedance mismatch at these bands.
- Later I switched to a much larger MFJ 998RT that could accommodate larger mismatches. I believe the MFJ can work with a 9:1 mismatch. Ideally I would have a much longer antenna for 160/80m but these are the restrictions I have.
- Every few years after the last freeze I cut the lawn short and lay new radial wires across the yard, then as the grass returns to life they disappear. After a couple grass cuttings with the mower the radials are forever buried by the mulched clippings.
My odd shaped property.
The back fence (BOG 1/3) is about 120 ft
The side fence (BOG 2/4) is about 120 ft
You can see the ground mounted 43-ft vertical, laying down in this satellite image.
Beverage on Ground (BOG) results
The vertical transmit antenna setup is practical for my location and HOA restrictions. It is a ‘workhorse’. It does well for transmitting and it has been good for receiving, within expectations anyway.
The BOG however excels at receiving and with it being reversable with just two elements I can have directionality to four compass coordinates! This is especially important on lower frequency HF bands where band wide noise becomes more and more significant. With only a 120ft element I am able to gain some directivity (maybe 100 deg) on 40, 30, 20m, 15 and 10m. Where it works well is dependent on the length it can run and my length was limited to about 120 ft.
As an example, in FT8 I was monitoring 3B8GL, in Mauritius, 10,589 miles away and while using the BOG pointing in that direction I decoded him at -3 dB. When I reversed the direction he was -20 dB. When I switched to the perpendicular element he wasn’t on the waterfall.
Performance vs band
| Ele. Length | 160m | 80m | 40m | 30m | 20m | 15m |
| 100 ft | P | F | G | G | E | E |
| 150 ft | F | F | G | E | E | E |
Relative Directivity vs band
| Ele. Length | 160m | 80m | 40m | 30m | 20m | 15m |
| 100 ft | Nil | P | G | E | E | E |
| 150 ft | Nil | F | G | E | E | G |
- The BOG increases signal-to-noise (SNR) by reducing noise.
- The BOG is directional unlike my omnidiretional vertical. This helps to reject interference from the unwanted directions.
- The BevFlex is REVERSABLE! Flip a switch and the antenna circuit is reversed!
- Two BevFlex receive antennas is all you need for the 4 compass corners!
- The BOG works particularly well on lower bands (160, 80, 40m) where atmospheric noise is significant
- The BOG is a compact alternative to the full size Beverage without sacrificing anything.
- The BOG can run along a wood privacy fence line so it’s not a tripping hazard and it is well cammoflaged by the fence itself.
- Unlike a traditional Beverage, the BOG is not a clothesline hazard.
- The BOG is visually approved by my spouse – it’s completely hidden.
How to test? Well, observations really. I monitored FT8 DX stations and would switch between the BOG and the vertical as the receive antenna. I easily found that the BOG significantly reduced noise. I also found that FT8 decoded signals differed by a few dB (up to 5dB) simply because the receiver had less noise and less interfering radio signals from the opposite direction. That is significant! More significant however was the directivity! I’m not used to having that with the 43ft vertical!
For another test, on higher bands I monitored the NCDXF/IARU International Beacon frequency on each band. I unfortunately do not have a list of shortwave stations and schedules for 1.8, 3.5 and 7 MHz so this is what I used for the second test.
Beacons are in CW Mode at 14.100, 18.110, 21.150, 24.930 and 28.200 MHz.
They transmit on 5 bands in succession every 10 seconds rotating around the globe, 24 hrs/day. I was not wearing my headphones.. just using the radio speaker. Maybe one day I will try this again with headphones.
The beacon callsign sent at 100 watts then a dash is sent at 10 watts, 1 watt, 100 mW. So if you hear a callsign and a dash, that dash was at 10 watts. If you hear a second dash that was at 1 watt!!
Azimuth Map Courtesy of Tom (NS6T) https://ns6t.net/azimuth/azimuth.html
The numbers I’ve placed indicate the order the beacons transmit. The yellow line is the direction of my BOG antennas – which are 60, 130, 240 and 310 deg. The directions were dictated by the location of my privacy fence. Note: At the time of the test, #18. YV5B is reportedly silent/off air. 4U1UN was also reported to be off air.
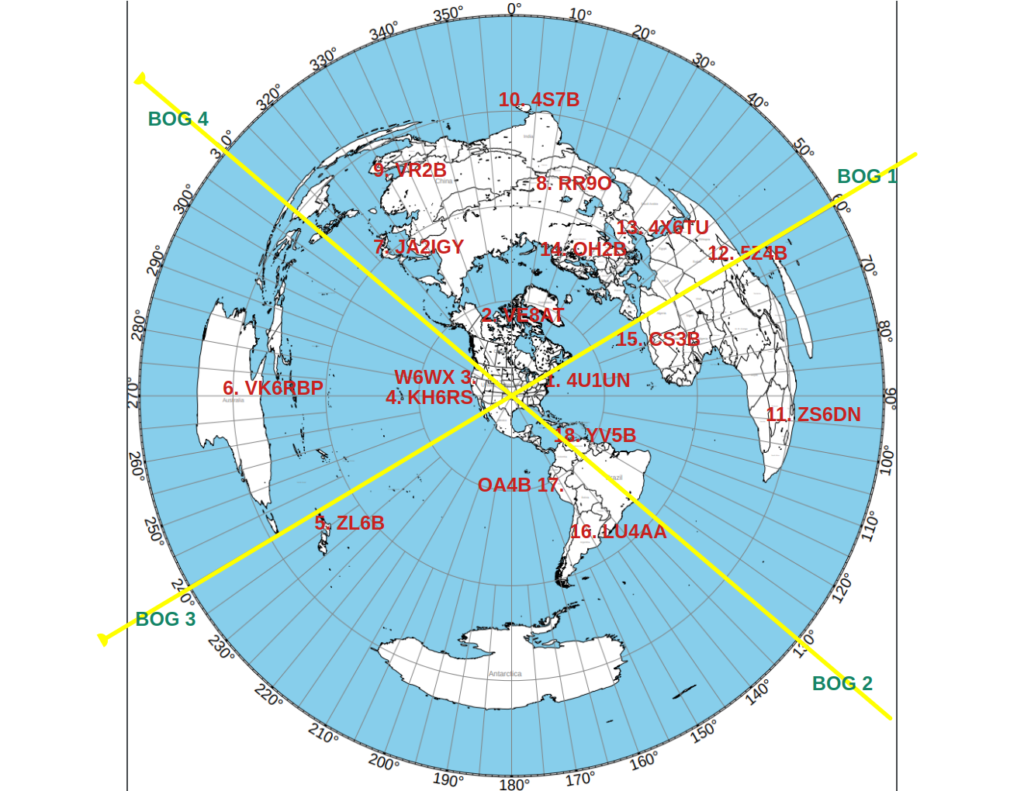
| BOG 1 at 20:30z | 20m | 17m | 15m | 12m | 10m |
| 15-CS3B | X | X | X | X | X |
| 11-ZS6DN | f | X | X | ||
| 2-VE8AT | f | f | X | ||
| 16-LU4AA | X |
| BOG 2 | 20m | 17m | 15m | 12m | 10m |
| 15-CS3B | X | f | |||
| 11-ZS6DN | X | f | |||
| 2-VE8AT | f | ||||
| 16-LU4AA | X | X | X |
| BOG 3 | 20m | 17m | 15m | 12m | 10m |
| 1-4U1UN | f | ||||
| 2-VE8AT | f | ||||
| 3-W6WX | X | X | X | ||
| 4-KH6RS | X | X | X | ||
| 5-ZL6B | X |
| BOG 4 | 20m | 17m | 15m | 12m | 10m |
| 15-CS3B | f | f | f | ||
| 2-VE8AT | X | X | X | ||
| 3-W6WX | X | f | |||
| 4-KH6RS | X | f | X | ||
| 16-LU4AA | f |
Construction
This took multiple days to install, and I needed more than 500 ft of RG6 (needed about 530 ft). I used 250 ft of 20/4 signal wire to connect the desk switch to the remote switch.
I dug a trench about 1 ft deep to run the wires from the house across to the fence. In the trench I used three bags of river rock in the bottom of the trench. I also drilled a few weep holes in the conduit pipe (1-1/4 in electrical conduit SCH40 pipe).
- 500 ft of trueCABLE RG6 Outdoor Quad Shield Coax
- 20 trueCABLE Universal Easy Fit RG6 & RG6Q Compression F-Connector for Dual Shield (DS) Tri-Shield and Quad Shield (QS) Coaxial Cable
- trueCABLE Wire Stripping and Cutting Tool for UTP, FTP, STP, Cat5e, Cat6, Cat6A Ethernet, RG59, RG6, RG7, RG11 Coax Cable, Adjustable Blade Depth
- 250 ft NATIONAL Wire&Cable – 20 Gauge 4 Conductors Premium Electrical Wire
- Pack of 100 Skywalker dual cable flexible screw clips
- Pack of 100 Skywalker single cable flexible screw clips
- (3) 4 ft ground rods (one per corner)
Day 1 & 2: Installing ground rods. Not a full-time thing, I was just time limited.
Day 3
- Mount a piece of superstrut with u-bolt to the steel fence post in the back corner of the yard.
- Mount the RAS-4 in the center using zip ties.
- Mount a BevFlex-4X on each side of the RAS-4, using zip ties.
- Mount two terminators using zip ties and connect terminators to the ground rod.
Day 4: Dig trench from house to fence
Day 5:
- Install conduit, pull string, etc.
- Run RG6 coax from BEV2 along bottom rail of the privacy fence.
- Attach RG6 to the bottom fence rail using single cable flexible screw clips
- Attach terminator and attach ground rod
Day 6:
- Run RG6 coax from BEV1 along bottom rail of the privacy fence .
- Attach RG6 to the bottom fence rail using single cable flexible screw clips
- Attach terminator and attach ground rod
- Run RG6 and control wire from RAS-4 to shack, along fence top rail, through PVC pipe into attic, across house into the radio room.
Day 7: Connect control wire to the 4-positon switch and the remote switch. Connect RG6 to the IC7610 receive antenna connector (BNC). The IC7610 has a 50 ohm impedance and yes I’m using 75 ohm coax.
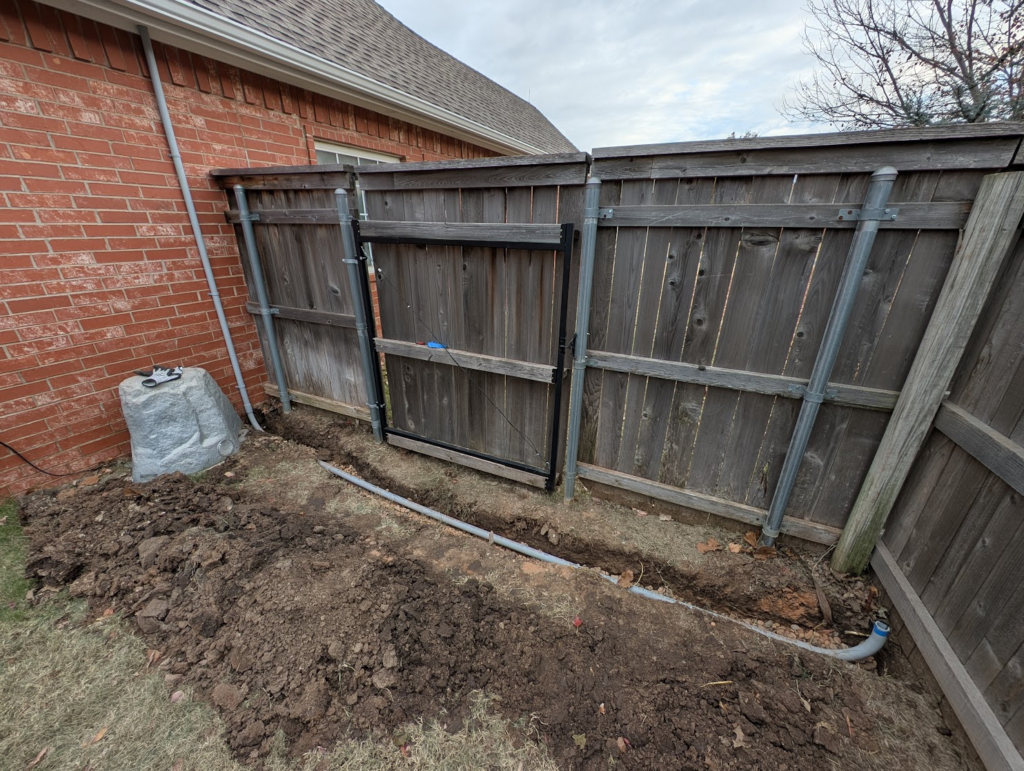
The fence is about 14 feet from the house..
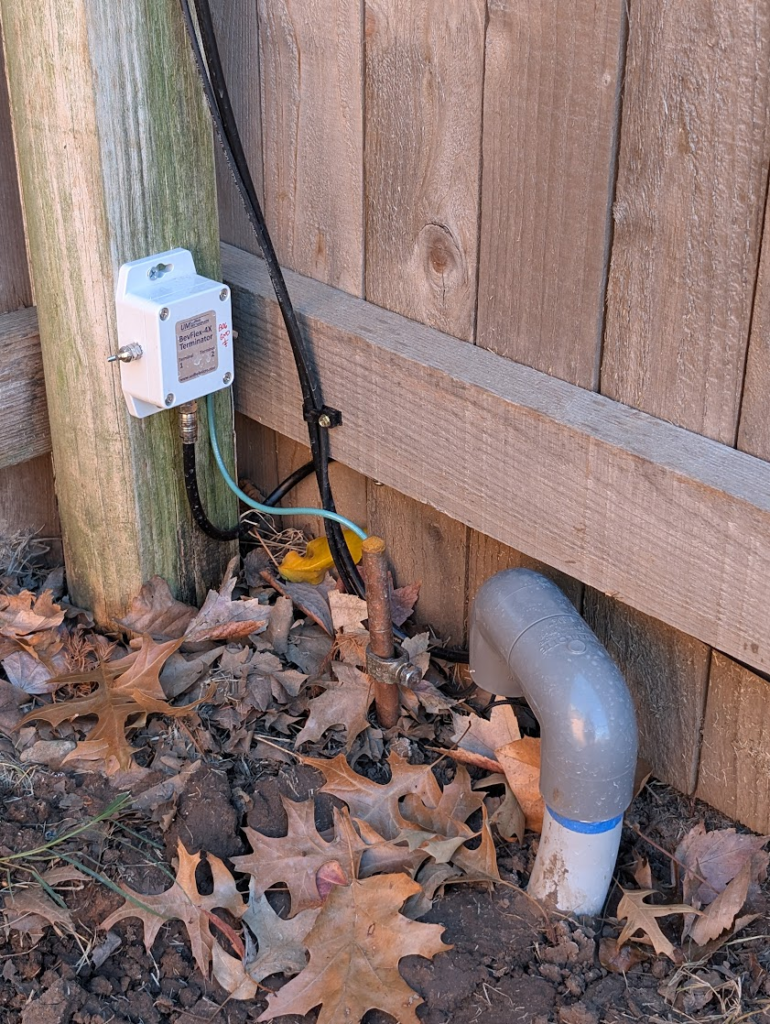
Here is a terminator for BOG2 and the coax & control wire emerging from the conduit to the top fence rail. The BOG2 element is affixed to the bottom fence rail and connects to the terminator.

Here you can see what is in the corner. The superstrut is U-bolted to a steel fence post. In the center is the remote switch. On each side is the feed unit for BEV1 and BEV2. On each end of that is the terminator for that end of each BOG element.
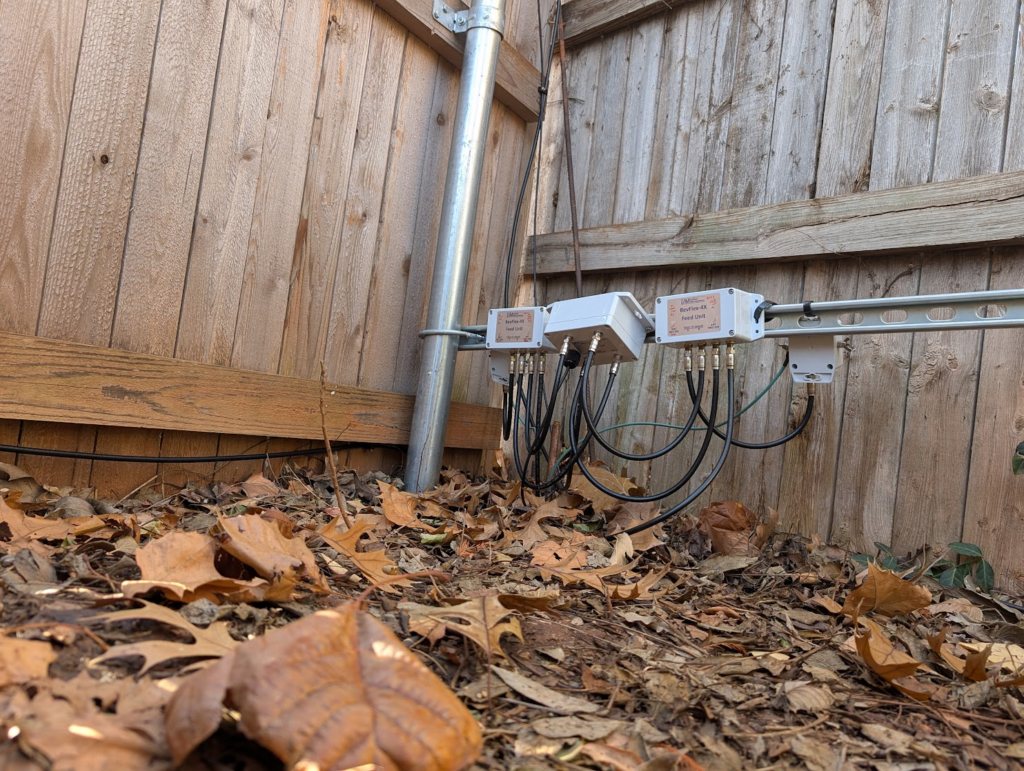
Finished.. (both BOG elements attached.)
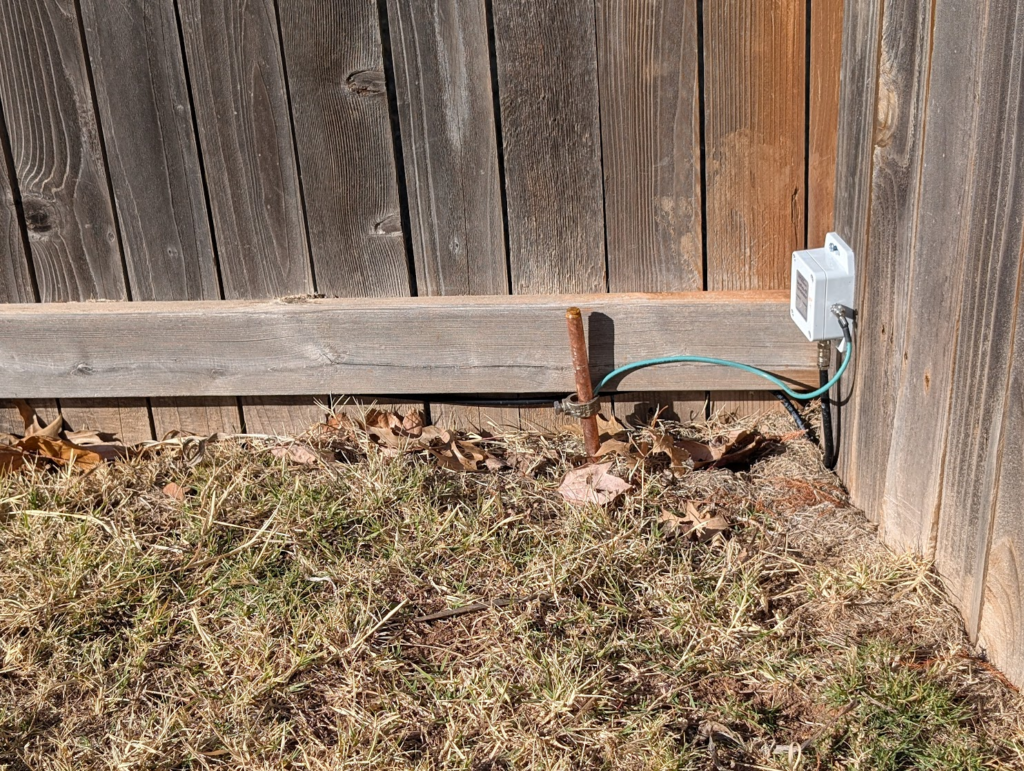
The other end of BOG1.